This is a sponsored post written by me on behalf of Cricut. All opinions are 100% mine. If you want an adorable elephant twin nursery decor idea to hang on the wall, this is it!
Our family is so looking forward to the arrival of our second set of twins at the end of August 2020 (or thereabouts). With two months or less left, we are working hard to prepare our home for baby’s arrival.
We are slowly accumulating all the things we will need, like new cribs, a new double stroller, crib mattresses, diapers, wipes, car seats, and so on.
RELATED: 15 Must-Have Baby Items Essential for Life with a Newborn
Because, though we had twins before, that was 10 years ago, and we have moved several times since their birth, across the country, and always try to purge as much as we can.
We never thought we’d actually have twins again, so we got rid of that second crib, and second car seat (plus they’d be expired by now anyway) years ago!
One of the big changes we’ve had to make is figuring out baby sleeping arrangements in our 4-bedroom home.
These twins will mark children #6 and #7 for us! We’ll have 9 people in 4 bedrooms, so figuring out how to make that all work the best has meant moving some kids around in bedrooms.
While a friend is giving us a twin bassinet to use for the first few months, to keep them in our bedroom with us, we like to move our babies into their own cribs by 4 months old or earlier.
We decided to room our new boy girl twins with our 2.5-year-old daughter, as they will all still take naps.
Our toddler had been with her big 5-year-old sister. But, now the 5-year-old daughter is bunked with our 7-year-old son, along with ALL the toys.
RELATED: 10 Tips for Selecting the Best Bunk Bed for Your Kids
We also took down all the stuff my son had on his walls (he previously had a room to himself), and put it in the new joint room.
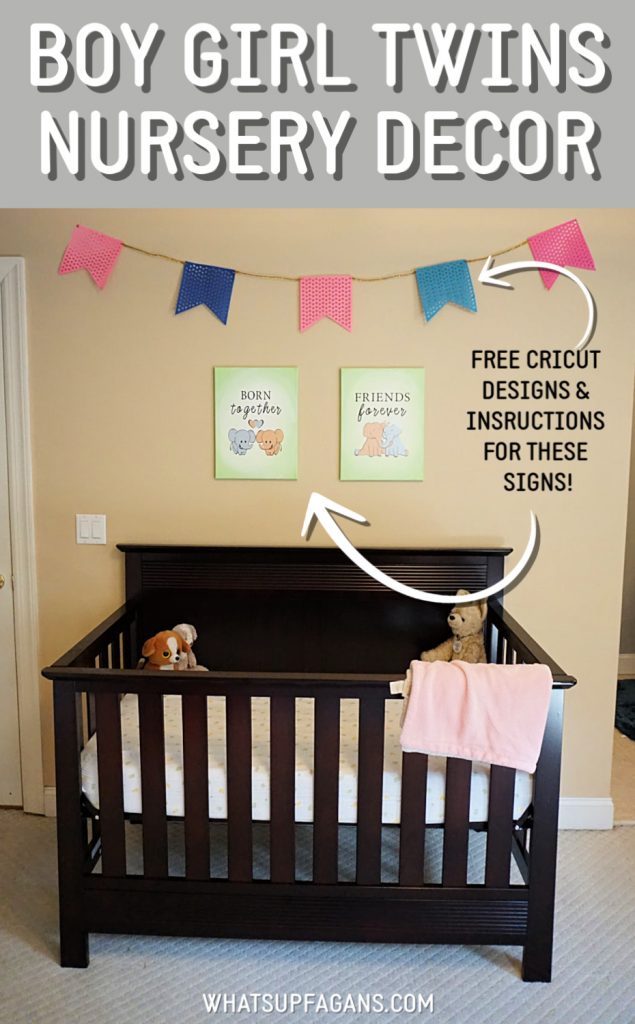
But, this left the new nursery very boring and plain walled!
In an effort to prep for these new babies, and make this room far cuter, I designed a boy-girl twin nursery decor piece using Cricut Design Space!
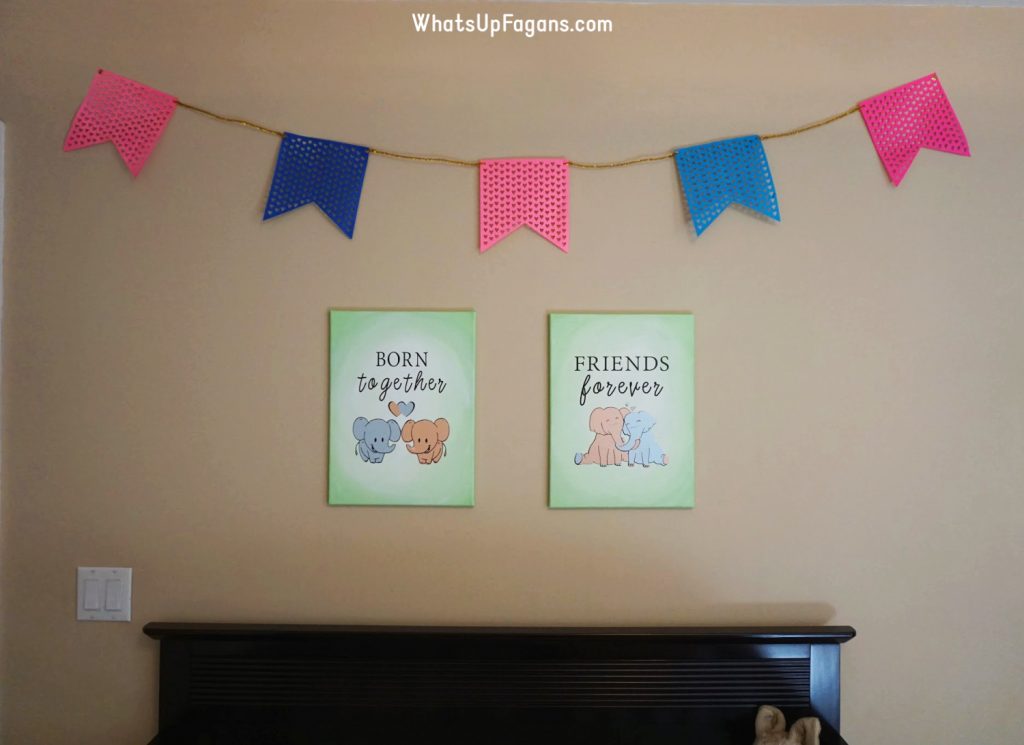
It is a design for two signs to go together, one that says “Born Together” and the next “Friends Forever.” I think it’s a pretty cute sentiment for our future twins. I do hope that their special bond of being grown and born together will help them be friends forever.
I added some adorable elephants to the bottom of the design, and some hearts, and I think it turned out amazing!
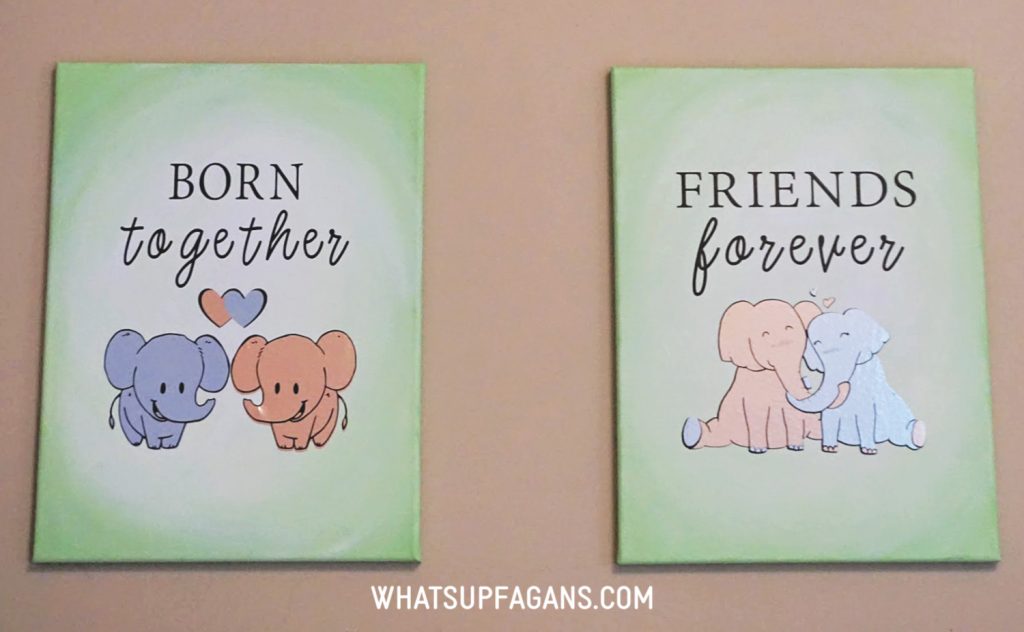
We already had some blank 12″ x 16″ white canvases on hand, so I knew I wanted to use them to put these designs on.
I had never used vinyl before (I’m still so new to the Cricut world but enjoying it so much) so I looked up a few tips for getting vinyl to stick on canvas better.
One of the tips was to paint the surface ahead of time, and the other to place a book under the canvas so you have something firm to rub the vinyl down against.
Super smart.
I did make the mistake of mirroring my vinyl. DO NOT MIRROR VINYL! I then had to run out to the store to get more black vinyl to finish this project. Lesson learned!
Also, this was my first time using Cricut transfer tape and it was NOT as easy as I thought it was going to be. I still need better tips for getting transfer tape lined up and smooth on my vinyl so there aren’t bubbles and other imperfections (thankfully the canvas texture hides a lot of them).
But, overall, the vinyl stuck pretty great to the painted canvas and I think the end project is just adorable!
I strung up a blue and pink banner (also from Cricut Design Space – I had used it for the twins’ gender reveal so I could have the cute hearts confetti for our confetti poppers in addition to our DIY scratch-off twin gender reveal cards) to add a little more texture and interest to the wall, and BAM – adorable twin boy and girl nursery decor!
If you are looking for twin nursery decor ideas for your boy and girl twins, I hope you’ll consider making your own using the design I created! You don’t have to put it on canvas either. You can put it on whatever surface you want, or even use iron-on you can put it on clothes or on whatever!
So many options with Cricut!
If you like really big designs, you should really check out the Cricut Joy too.
Despite its small compact size, the Cricut Joy is capable of making all sorts of sized projects, as it uses Cricut Joy Smart Materials, which are different from other vinyl and paper. These materials are designed to work without a cutting mat!
If you are looking to customize things in one cut and one color (like text), you can easily do that with the Cricut Joy in 15 minutes or less!
Whatever you do, I hope you make your twins nursery decor as precious as your new babes. 🙂
How to Make Boy Girl Twin Nursery Decor with the Cricut
Supplies Needed:
- Cricut cutting machine (I used my Circut Explore Air 2)
- Cricut reusable adhesive cutting mats
- Cricut transfer tape
- Cricut Premium Vinyl – Black
- Cricut Premium Vinyl – Pink (I used this one)
- Cricut Premium Vinyl – Blue (I used this one)
- Cricut scraper (or brayer)
- 12″ x 16″ stretched canvases
- Acrylic paint (or Modge Podge)
- Paintbrushes
- Large book the same thickness as your canvas
- SVG project file on Cricut Design Space
Time needed: 1 hour
Create a beautiful piece of twin nursery decor by following these directions below:
- Prepare your canvases!
If you are applying the vinyl to a canvas, like I did, it is best to paint the surface for easier transferring. I used craft acrylic paints. You can paint the canvases white, green (like I did), or even just apply some Modge Podge to the surface.
Be sure to paint the edges if you won’t be framing these. Make sure to let it dry completely.
- Download the SVG project file on Cricut Design Space for FREE here.
You can choose to customize the colors, size, fonts, or whatever if you need or want to.

- Prep your mats for cutting out the vinyl shapes.
Remember, shiny side up for vinyl and do NOT mirror!!
- Use your Cricut cutting machine to cut out the vinyl shapes and then remove from backing.
Follow the directions in Cricut Design space for cutting out your specific type of vinyl, and moving mats in and out, and so on.
Once cut, weed and remove the unneeded parts of the design from the vinyl.
- Apply contact transfer paper to the blue heart.
Be careful to smooth out bubbles and bumps as best as possible when adding the contact paper in all of the following steps! Make sure the vinyl designs lift from the backing to the transfer paper.
- Stack heart vinyl.
Take the blue heart that has contact paper applied to it, and carefully line it up next to the pink heart, so it fits in the notch designed for it. Then attach the pink heart to the same contact paper as the blue heart, rubbing it down well.
Then apply the blue and pink hearts on top of the black conjoined hearts, centering them with a bigger black border on the outsides.
Remove the transfer paper from the pink and blue hearts.
- Carefully apply transfer paper to black “Born Together” vinyl design.
With a large area needing to have transfer paper applied, go slow and work out bubbles as you go. Make sure to give special attention to the edges of the text so they adhere well before removing the vinyl from its backing sheet.

- Stack the pink and blue vinyl baby elephant designs to the “Born Together” image.
Flip over the “Born Together” transfer sheet image. Carefully remove first the blue baby elephant from its backing (no transfer tape needed) and line it up carefully in the black elephant silhouette on the (now) right side of the design.
Repeat this with the pink baby elephant, but on the left side of the design.
In both, the elephant should line on top of the black outline, and not beneath for a better fit. - Apply the “Born Together” image to the canvas.
Put a book the same or relatively the same thickness as your canvas underneath your canvas (so you have something to rub down your design hard against).
Measure and mark (with a pencil) the halfway point of your canvas on the top and bottom of your canvas, a few inches down (I did about 3″) from the top and a few inches up from the bottom.
Line up your “Born Together” image according to these lines, and then begin to burnish your design to the canvas, paying special attention to the skinny letters.
Once pressed down, carefully remove the transfer tape from the image and canvas! Yeah! It’s done!
- Apply transfer tape to the blue adult elephant and adhere to pink adult elephant.
Carefully line up and then rub transfer paper to the blue adult elephant design. Once adhered, remove the elephant from its vinyl backing sheet.
Carefully line up blue adult elephant on top of the pink elephant. There should be a gap/border between the parts (where black will be later).
Rub the pink elephant onto the same transfer sheet. Remove from vinyl backing paper.
- Adhere adult elephants to the “Friends Forever” design.
Take the transfer sheet with the two elephants and place it carefully on top of the black elephant silhouette on the “Friends Forever” sheet.
Firmly transfer the elephants onto the black vinyl, then remove the transfer sheet.
- Adhere “Friends Forever” design to transfer sheet.
Now put down a new transfer sheet on top of the completed “Friends Forever” design, making sure to rub well on all the parts of the letters.
Carefully remove the image from the white vinyl backing. - Adhere the “Friends Forever” design to the canvas.
Put a book the same or relatively the same thickness as your canvas underneath your canvas (so you have something to rub down your design hard against).
Measure and mark (with a pencil) the halfway point of your canvas on the top and bottom of your canvas, a few inches down (I did about 3″) from the top and a few inches up from the bottom.
Line up your “Friends Forever” image according to these lines, and then begin to burnish your design to the canvas, paying special attention to the skinny letters.
Once pressed down, carefully remove the transfer tape from the image and canvas! Yeah! It’s done! - Adhere to the wall as desired.
Using wires or adhesive strips, attach the completed canvases to your twins’ nursery decor!

For more great tips for twins and babies, check out these other great posts:
- Breast Pumps for Twins: How to Use Them for Breastfeeding Success
- The Best and Worst Things About Being Pregnant with Twins
- 30+ Common Things Strangers Say to Parents of Twins
- Diaper Review: Pros, Cons, and Costs of Top Diaper Brands
- The Thrifty Mom’s Guide to Basic Baby Feeding Supplies
- 10 Smart Ways to Lose the Baby Weight Postpartum
- 4 Easy Ways to Remove Baby Poop Stains
- How Walmart Baby Registry Compares to Other Top Registries


Jacinta says
I would like to make the Boy Girl Twin Nursery Deco but I cannot download the file. It is not available. Do you have any suggestions to help me access that file? Thanks!